Introduction
This blog post discusses how to build offline-first Power Apps that store data and images locally when there is no internet connection, then synchronize them to SQL Server and Azure Blob Storage once the device is back online. Perfect for field workers, mobile apps, and low-connectivity environments.
In a previous post, I created a Power App that saves data to SQL Server and images to Azure Blob Storage. In this post, I will add the ability to save data and images locally when the device is offline and provide the ability to save both to the cloud once the device is back online.
If you did not catch the previous post, click on the link here as it will serve as the foundation to this post. I will try to focus mostly on the changes between the two apps: Save Images to Azure Blob Storage via Power Apps and Reference them from a SQL Database – TW-Waytek
App Screens
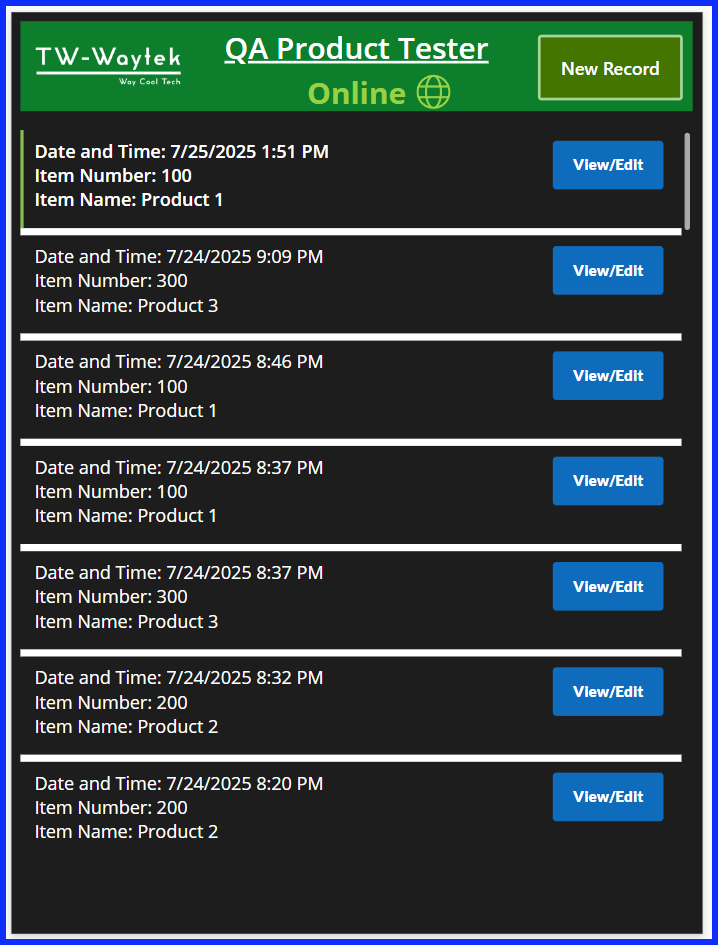

Screen Header Connection Status Label

On the header I added a label that displays an indicator informing the user when the device is online or offline. I use an If statement for the text and the color to check to see if the device is online, and if it is, the text will display Online and the color will be light green. If the device is offline the text changes to Offline and the color changes to red.
Code For Text:
If(Connection.Connected,"Online", "Offline")Code for Color:
If(Connection.Connected, RGBA(152, 208, 70, 1), RGBA(255, 0, 0, 1))App OnStart Property
For the app OnStart property, I start with creating a Collection use to store data in while the device is offline. It is not an exact duplicate of the table in the SQL database but close, let me go over the elements.
Main Table Collection Description
The Collection is called colOfflineData, I start all my collections with col. I also end all my fields in the collection with _col, this becomes important at the time of saving the collection to SQL server on the Offline Save Button to be discussed later.
The first field is Offline_ID_col and it acts as the primary key for the collection. It is needed when editing the values in the collection before saving to SQL Server. The other fields match the fields in SQL Server except the image fields.
For the image fields, I use two fields, one to capture the image itself and the other to capture the image file name.
After creating the collection, it is cleared and if data in the collection was previously saved to the device it will be loaded into the collection.
Main Table Collection Code
ClearCollect(
    colOfflineData,
            {
                Offline_ID_col: Blank(),

                TimeaDate_col: Blank(),
                User_Name_col: Blank(),

                Item_Number_col: Blank(),
                Item_Name_col: Blank(),
                Product_Test_col: Blank(),
                Comments_col: Blank(),

                Image_col: Blank(),
                ImageFileName_col: Blank()
            }
);
Item List Lookup Table Description
To ensure full offline functionality, it is essential to store all necessary lookup tables locally on the device. I established a secondary collection, colItemList, designed to retrieve all entries from the items SQL table utilized in the form’s lookup table. The process is as follows:
When the device is connected to the internet, the collection is cleared and initialized with an empty record to provide a blank entry at the top of the associated drop-down menu, a useful feature for user selection. Subsequently, data from the Item List table in SQL is collected and saved locally to a file named savedItemListData. In instances where the device is offline, data is loaded from the savedItemListData file, if available.
Item List Lookup Table Code
Clear(colOfflineData);
LoadData(colOfflineData, "savedOfflineData", true);

If(
    Connection.Connected,
    ClearCollect(colItemList, {Item:""});
    Collect(colItemList, Item_List);
    SaveData(colItemList,"savedItemListData"),
    LoadData(colItemList, "savedItemListData", true)
)
Online Form Screen
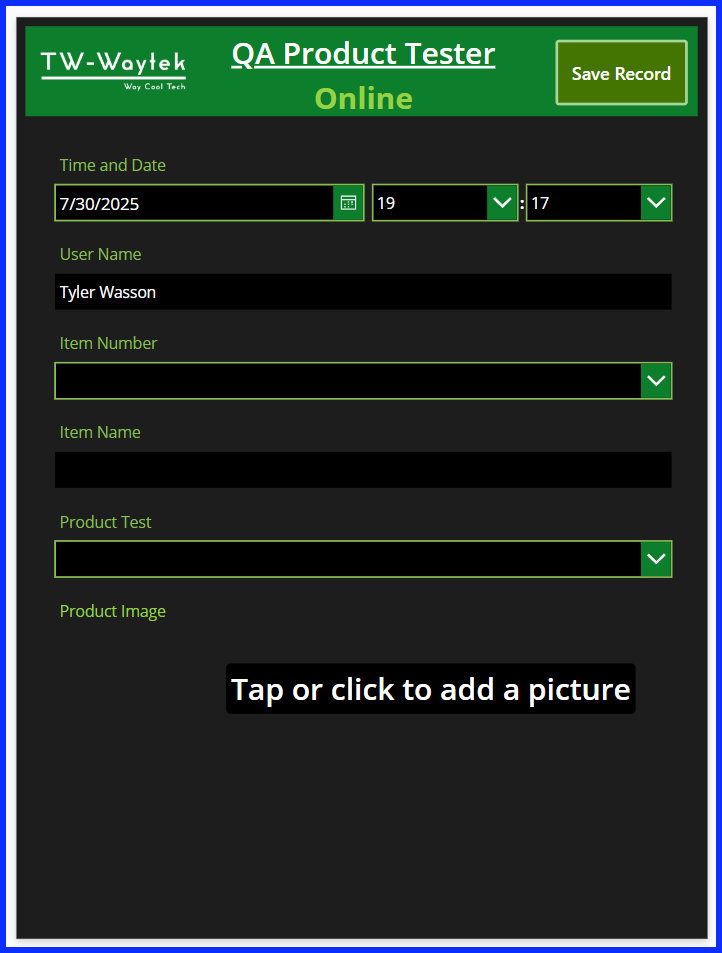
Save Button Property

All the If statements except for the offline component need the formula Connection.Connect = true added to the statement. This allows the Online Form Screen to operate in both an online and offline mode when creating the record. This means that if you started updating the new record while the device was online and in the middle of the entry lost connectivity the record would still save locally.
Offline Collection
Two additional components were added to the formula, first is the collection for when the device goes offline. When a new offline record is created, the collection record ID (Offline_ID_col) is increased by one. The image file and file name is also saved to the collection.
//Offline-New Image and Non-Image Fields saved to device in a Collection
    If(
        Connection.Connected = false And Form1.Mode = FormMode.New,
            Collect(
                    colOfflineData,
                        {
                            Offline_ID_col: CountRows(colOfflineData)+1,

                            TimeaDate_col:DateValue2.SelectedDate + Time(Value(HourValue2.Selected.Value),   Value(MinuteValue2.Selected.Value),0),
                            User_Name_col: DataCardValue8.Text,

                            Item_Number_col:DataCardValue6.Selected.Item_Number,
                            Item_Name_col:DataCardValue1.Text,
                            Product_Test_col:DataCardValue7.Selected.Value,
                            Comments_col:DataCardValue3.Text,

                            Image_col:UploadedImage1.Image,
                            ImageFileName_col:AddMediaButton1.FileName
                        }
                 );

                SaveData(colOfflineData,"savedOfflineData")
            );
Error Reporting, Notification, and Navigation
The second update was to the error reporting, notification, and navigation based on whether the device is online or offline. If the device is online the error reporting is based on the SQL Server table and based on the collection if the device is offline. Below is the updated code.
//If success, notify, if not report the error
If(
    Connection.Connected = true And IsEmpty(Errors(Item_Test)),

    Navigate(OnlineGalScreen);
    Notify("Form Data Submitted Successfully",NotificationType.Success);
    ResetForm(Form1),
    Notify(First(Errors(Item_Test)).Message,NotificationType.Error)
);

If(
    Connection.Connected = false And IsEmpty(Errors(colOfflineData)),

    Navigate(OnlineGalScreen);
    Notify("Form Data Submitted Successfully",NotificationType.Success);
    ResetForm(Form1),
    Notify(First(Errors(colOfflineData)).Message,NotificationType.Error)
);
Combined Save Button Code
Below is the code combined into one expression:
If(
    Connection.Connected = true And Form1.Mode = FormMode.Edit,
    Patch(
        Item_Test,
        LookUp(Item_Test, Id = SQLDataGallery1.Selected.Id),
        {
            Item_Number:DataCardValue6.Selected.Item_Number,
            Item_Name:DataCardValue1.Text,

            Product_Test:DataCardValue7.Selected.Value,
            Comments:DataCardValue3.Text
        }
    )
);

//Online-New Non-Image Field Records-SQL
    If(
        Connection.Connected = true And Form1.Mode = FormMode.New,
            Set(
         varNewRecord,
            Patch(
                Item_Test,
                Defaults(
                    Item_Test),
                        {
                            TimeaDate:DateValue2.SelectedDate + Time(Value(HourValue2.Selected.Value), Value(MinuteValue2.Selected.Value),0),
                            User_Name: DataCardValue8.Text,

                            Item_Number:DataCardValue6.Selected.Item_Number,
                            Item_Name:DataCardValue1.Text,

                            Product_Test:DataCardValue7.Selected.Value,
                            Comments:DataCardValue3.Text
                        }
                )
        )
);

//Online-New Image Record-Save Image to Blob and Meta data to SQL Server
        If(
            Connection.Connected = true And Form1.Mode=FormMode.New And Not(IsBlank(AddMediaButton1.Media)),
            Set(varImage1FileName, Concatenate("Item_Test", "-", Text(Now(), "yyyymmdd-HHmmss"), "-", AddMediaButton1.FileName))
        );

        If(
            Connection.Connected = true And Form1.Mode=FormMode.New And Not(IsBlank(AddMediaButton1.Media)),
            Set(varAzureImage1, AzureBlobStorage.CreateFileV2("twwaytek", "blobtest", varImage1FileName, AddMediaButton1.Media))
        );

        If(
            Connection.Connected = true And Form1.Mode=FormMode.New And Not(IsBlank(AddMediaButton1.Media)),
            Collect(colImages1, {FN1: varImage1FileName, FL1: "https://twwaytek.blob.core.windows.net" & varAzureImage1.Path, FID1: varAzureImage1.Id})
            );

        If(
            Connection.Connected = true And Form1.Mode=FormMode.New And Not(IsBlank(AddMediaButton1.Media)),
            ForAll(
            colImages1,
            Patch(
                 Item_Test,
                LookUp(Item_Test, Id = varNewRecord.Id),
                    {
                        Image_Name:FN1,
                        Image_Link:FL1,
                        Image_ID:FID1
                    }
                )
            )
        );

    //Reset variables and collections used above
        Set(varNewRecord, Blank());
        Set(varImage1FileName, Blank());
        Set(varAzureImage1, Blank());

        Clear(colImages1);

 //Offline-New Image and Non-Image Fields saved to device in a Collection
    If(
        Connection.Connected = false And Form1.Mode = FormMode.New,
            Collect(
                    colOfflineData,
                        {
                            Offline_ID_col: CountRows(colOfflineData)+1,

                            TimeaDate_col:DateValue2.SelectedDate + Time(Value(HourValue2.Selected.Value), Value(MinuteValue2.Selected.Value),0),
                            User_Name_col: DataCardValue8.Text,

                            Item_Number_col:DataCardValue6.Selected.Item_Number,
                            Item_Name_col:DataCardValue1.Text,
                            Product_Test_col:DataCardValue7.Selected.Value,
                            Comments_col:DataCardValue3.Text,

                            Image_col:AddMediaButton1.Media,
                            ImageFileName_col:AddMediaButton1.FileName
                        }
                 );

                SaveData(colOfflineData,"savedOfflineData")
            );

//If success, notify, if not report the error
If(
    Connection.Connected = true And IsEmpty(Errors(Item_Test)),

    Navigate(OnlineGalScreen);
    Notify("Form Data Submitted Successfully",NotificationType.Success);
    ResetForm(Form1),
    Notify(First(Errors(Item_Test)).Message,NotificationType.Error)
);

If(
    Connection.Connected = false And IsEmpty(Errors(colOfflineData)),

    Navigate(OnlineGalScreen);
    Notify("Form Data Submitted Successfully",NotificationType.Success);
    ResetForm(Form1),
    Notify(First(Errors(colOfflineData)).Message,NotificationType.Error)
);
Image and Image OnChange Property
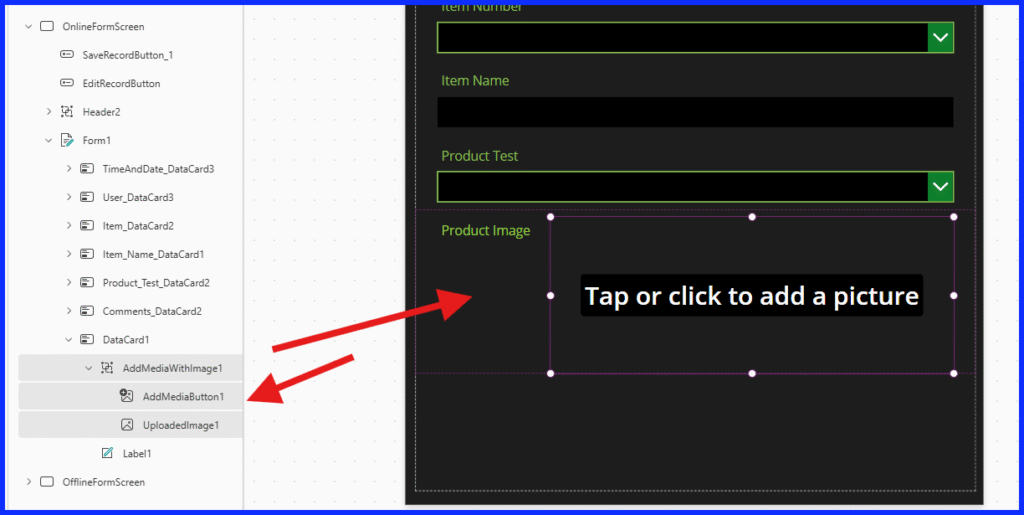
Image Property
The only change here is to add Connection.Connected = true to the If statement in the image property code.
If(
    Connection.Connected = true And
    Form1.Mode <> FormMode.New And
    IsBlank(AddMediaButton1.Media) And
    Not(IsBlank(ThisItem.Image_ID)),

    AzureBlobStorage.GetFileContentV2("twwaytek", ThisItem.Image_ID),
    AddMediaButton1.Media
)
Image AddMedia OnChange Property
Same for the AddMedia OnChange Property, add “Connection.Connected = true And” at the start of each If statement.
//Edit Image 1

//When in Edit Mode, get existing image blob ID stored in SQL Server and save it in varBlobID1
If(
    Connection.Connected = true And Form1.Mode=FormMode.Edit,
    Set(varBlobID1, LookUp(Item_Test, Id = SQLDataGallery1.Selected.Id, Image_ID))
);

//When in Edit Mode and a new image was added to AddMediaButton, delete previous image using the Blob storage ID from varBlobID1
If(
    Connection.Connected = true And Form1.Mode=FormMode.Edit And Not(IsBlank(AddMediaButton1.Media)),
    AzureBlobStorage.DeleteFileV2("twwaytek", varBlobID1)
);

//When in Edit Mode and a new image was added to AddMediaButton, create a file name and save it in varImage1FileName
If(
    Connection.Connected = true And Form1.Mode=FormMode.Edit And Not(IsBlank(AddMediaButton1.Media)),
    Set(varImage1FileName, Concatenate("Item_Test", "-", Text(Now(), "yyyymmdd-HHmmss"), "-", AddMediaButton1.FileName))
);

//When in Edit Mode and a new image was added to AddMediaButton, save file to blob storage using varImageFileName and file properties in AddMediaButton, then save blob storage file meta data to varAzureImage1
If(
    Connection.Connected = true And Form1.Mode=FormMode.Edit And Not(IsBlank(AddMediaButton1.Media)),
    Set(varAzureImage1, AzureBlobStorage.CreateFileV2("twwaytek", "blobtest", varImage1FileName, AddMediaButton1.Media))
);

//When in Edit Mode and a new image was added to AddMediaButton, create a collection called colImages1 that contains the blob storage image Name, URL and ID
If(
    Connection.Connected = true And Form1.Mode=FormMode.Edit And Not(IsBlank(AddMediaButton1.Media)),
    Collect(colImages1, {FN1: varImage1FileName, FL1: "https://twwaytek.blob.core.windows.net" & varAzureImage1.Path, FID1: varAzureImage1.Id})
    );

//When in Edit Mode and a new image was added to AddMediaButton, Patch the collection colImages1 columns File Name, URL and ID to the edited record in SQL Server
If(
    Connection.Connected = true And Form1.Mode=FormMode.Edit And Not(IsBlank(AddMediaButton1.Media)),
    ForAll(
    colImages1,
    Patch(
        Item_Test,
        LookUp(Item_Test, Id = SQLDataGallery1.Selected.Id),
            {
                Image_Name:FN1,
                Image_Link:FL1,
                Image_ID:FID1
            }
        )
    )
);

//Reset the variables and collection below:
Set(varBlobID1, Blank());
Set(varImage1FileName, Blank());
Set(varAzureImage1, Blank());

Clear(colImages1);
Offline Form Screen
The Offline Form Screen is used to view or edit records in the collection while the device is offline. The first step is to duplicate the Online Form Screen by right clicking on it in the tree view and selecting Duplicate Screen.
Next, click on the form in the Tree View and change its data source to the collection colOfflineData. This will give you red x’s across the form indicating where you need to update the code to address the change in the data source. Since our collection field names end in _col you will need to add _col to the field names in each of the fields on your form except the image data card, leave that until the end as we will be making changes to it.
Change the Form default mode to FormMode.View.
Save Button Property
Below is the updated code for the Save Button OnSelect property that you need to replace. Here we patch to the collection and reference the selected item in the collection to edit using the Offline_ID_col field. We then save the changes to the local file and either report back any errors on patch or reset the form and navigate to the gallery screen.
Patch(
    colOfflineData,
    LookUp(colOfflineData, Offline_ID_col = ColDataGallery1_2.Selected.Offline_ID_col),
        {
            Item_Number_col:DataCardValue6_1.Selected.Item_Number,
            Item_Name_col:DataCardValue1_1.Text,

            Product_Test_col:DataCardValue7_1.Selected.Value,
            Comments_col:DataCardValue3_1.Text,

            Image_col:UploadedImage1_1.Image,
            ImageFileName_col:AddMediaButton1_1.FileName
        }
    );

SaveData(colOfflineData, "savedOfflineData");


//If success, notify, if not report the error
If(
    IsEmpty(Errors(colOfflineData)),

    Navigate(OnlineGalScreen);
    Notify("Form Data Submitted Successfully",NotificationType.Success);
    ResetForm(Form1_1),
    Notify(First(Errors(colOfflineData)).Message,NotificationType.Error)
);
Image and Image OnChange Code
For the AddMedia:OnChange property remove the existing code and replace it with “false”. Below is the updated code for the Image:Image property which states, if the form is not in New mode and there is no image in the add media button, then reference the image in the collection or else show the image in the add media button.
If(
    Form1_1.Mode<>FormMode.New And
    IsBlank(AddMediaButton1_1.Media),
    LookUp(colOfflineData, Offline_ID_col = ColDataGallery1_2.Selected.Offline_ID_col).Image_col,
    AddMediaButton1_1.Media
    )
Online Gal Screen
ColDataGallery1_2
Duplicate the SQLDataGallery1 gallery by copying it and pasting it in the OnlineGalScreen. You will want to manually adjust the height of each gallery. Match the height of the ColDataGallery1_2 to one record in the gallery and align it underneath the header. Align the height of the SQLDataGallery1 with the bottom of the ColDataGallery1_2 and then to the bottom of the screen.
Update the OnSelect property of the View/Edit button so it navigates to the OfflineFormScreen and updates the DefaultMode to FormMode.View.
ViewForm(Form1_1); Navigate(OfflineFormScreen);Duplicate the View/Edit button and rename its label to Save. This is the button we use to save the offline record.
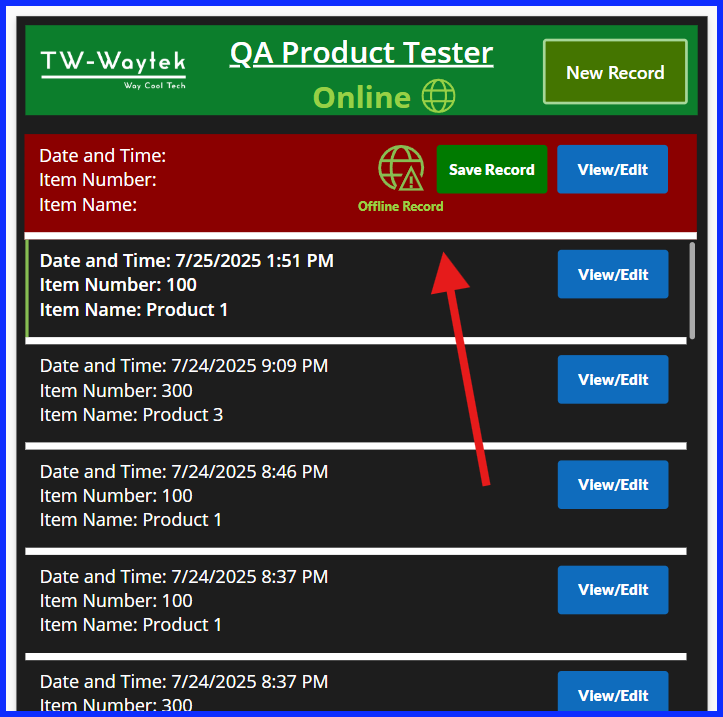
Update the Visible property of the Save button to only show when the device is online.
If(Connection.Connected, true, false)Update the OnSelect property to save the current record in the collection to the cloud when the device is back online. This will include saving both the data and the image and then removing the record in the collection.
I set the varNewRecord variable to the record created in SQL Server. It is used to reference the record ID when saving the blob image meta data back to SQL Server.
Each non-image field value is retrieved from the collection to be saved in SQL Server using a lookup based on the selected record in the collection.
//Save Non-Image fields to SQL Server and save the SQL Server table record ID to varNewRecord
Set(varNewRecord,
Patch(
    Item_Test,
    Defaults(Item_Test),
        {
            TimeaDate: LookUp(colOfflineData, Offline_ID_col = ColDataGallery1_2.Selected.Offline_ID_col).TimeaDate_col,
            User_Name: LookUp(colOfflineData, Offline_ID_col = ColDataGallery1_2.Selected.Offline_ID_col).User_Name_col,

            Item_Number: LookUp(colOfflineData, Offline_ID_col = ColDataGallery1_2.Selected.Offline_ID_col).Item_Number_col,
            Item_Name: LookUp(colOfflineData, Offline_ID_col = ColDataGallery1_2.Selected.Offline_ID_col).Item_Name_col,

            Product_Test: LookUp(colOfflineData, Offline_ID_col = ColDataGallery1_2.Selected.Offline_ID_col).Product_Test_col,
            Comments: LookUp(colOfflineData, Offline_ID_col = ColDataGallery1_2.Selected.Offline_ID_col).Comments_col
        }
    )
);
Next is the code for uploading the image to blob. First, we check to make sure we are connected to the Internet and there is an image to upload.
Then we save the image and image file name in new variables, save them to Azure Blob Storage and reference it’s meta data back to SQL Server.
The record is then removed from the collection. The variables used in the process are reset to blank. The blank collection is then saved to the local device. Errors are reported if found.
This will remove the record in the colDataGallery1_2.
//Save new image1 field to blob storage and then reference blob storage image meta data back to sql server
If(
    Connection.Connected And Not(IsBlank(ThisItem.Image_col)),

    Set(varColImage, LookUp(colOfflineData, Offline_ID_col = ThisItem.Offline_ID_col).Image_col);
    Set(varImageName, LookUp(colOfflineData, Offline_ID_col = ThisItem.Offline_ID_col).ImageFileName_col);
    Set(varImage1FileName, Concatenate("Item_Test", "-", Text(Now(), "yyyymmdd-HHmmss"), "-", varImageName));

    Set(varAzureImage1, AzureBlobStorage.CreateFileV2("twwaytek", "blobtest", varImage1FileName, varColImage));

    Collect(colImages1, {FN1: varImage1FileName, FL1: "https://twwaytek.blob.core.windows.net" & varAzureImage1.Path, FID1: varAzureImage1.Id});

    ForAll(
    colImages1,
    Patch(
        Item_Test,
        LookUp(Item_Test, Id = varNewRecord.Id),
            {
                Image_Name:FN1,
                Image_Link:FL1,
                Image_ID:FID1
            }
        )
    )
);

//Delete this record from the collection
Remove(colOfflineData, LookUp(colOfflineData, Offline_ID_col = ThisItem.Offline_ID_col));

//Reset variables
Set(varNewRecord, Blank());
Set(varColImage, Blank());
Set(varImageName, Blank());
Set(varImage1FileName, Blank());
Set(varAzureImage1, Blank());
Clear(colImages1);

//Update collection records on device
SaveData(colOfflineData, "savedOfflineData");

//If success, notify, if not report the error
If(
    IsEmpty(Errors(Item_Test)) Or  IsEmpty(Errors(colOfflineData)) ,
    Notify("Form Data Submitted Successfully",NotificationType.Success),
    Notify("There was an issue submitting the form data. Please try again.", NotificationType.Error, 5)
);
Add a label and a warning icon to the gallery. Add the text “Offline Record” to the label and align both next to the Save button as shown below.
Update the height property for ColDataGallery1_2 to adjust its height based on the number of records in the collection. Remember the height of one record must be manually calculated prior to updating this property.
117 * CountRows(colOfflineData)SQLDataGallery1
Update the DisplayMode property for the View/Edit button with the code below. This prevents the user from trying to view the online records while the device is offline.
If(
    Connection.Connected,
    DisplayMode.Edit,
    DisplayMode.Disabled
)
Update the Y property to align with the bottom of ColDataGAllery1_2 is as it will grow in height for each new offline record. Use the code below.
ColDataGallery1_2.Y + ColDataGallery1_2.HeightClosing
There is definitely a lot to absorb in this post and I hope it helps you with the challenge of working with offline devices and using a data source other than Dataverse which has offline capabilities built into it.
As you continue to develop solutions that support both online and offline scenarios, remember that flexibility and thoughtful design are key to delivering a seamless user experience. By anticipating connectivity challenges and implementing adaptive features, you empower users to stay productive regardless of their environment.