Intro
In a previous blog post I created a Vacation tracker in a SharePoint List and in this post, I’ll be adding enhancements to the list. These enhancements are fairly straight forward and will improve the vacation tracker’s functionality. I’ve received several comments on my Vacation Tracker YouTube video with viewers asking for additional features which prompted the creation of this post. Below is a list of the improvements I’ll be discussing:
- Rules and Alert Me
- Calendar View Conditional Formatting
- Hour’s tracking
- Vacation reminders
- Approvals
Rules and Alert Me
Rules and alerts are easy to setup, useful, and built into SharePoint. They both do most of the same things except Rules are more modern while Alert Me is a legacy component in SharePoint. I decided to discuss both since they have slightly different features. They both provide notifications when certain actions happen to your list.
Catch a video of this post below:
Rules
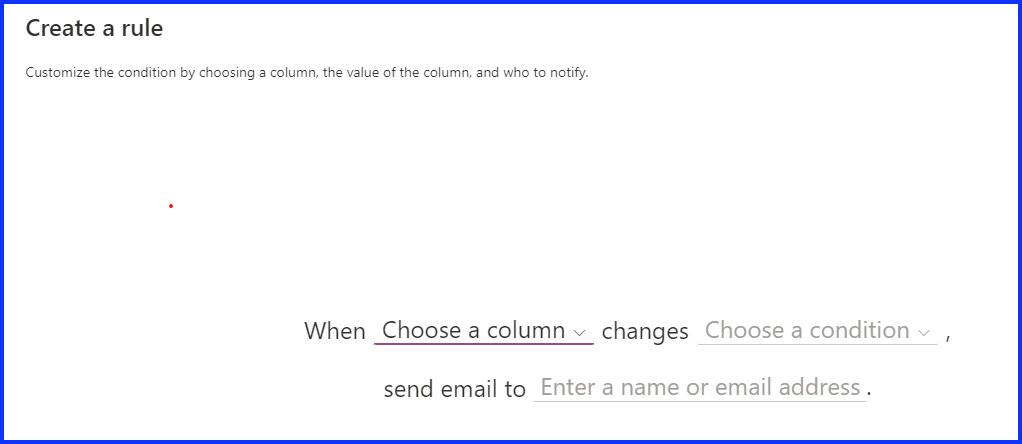
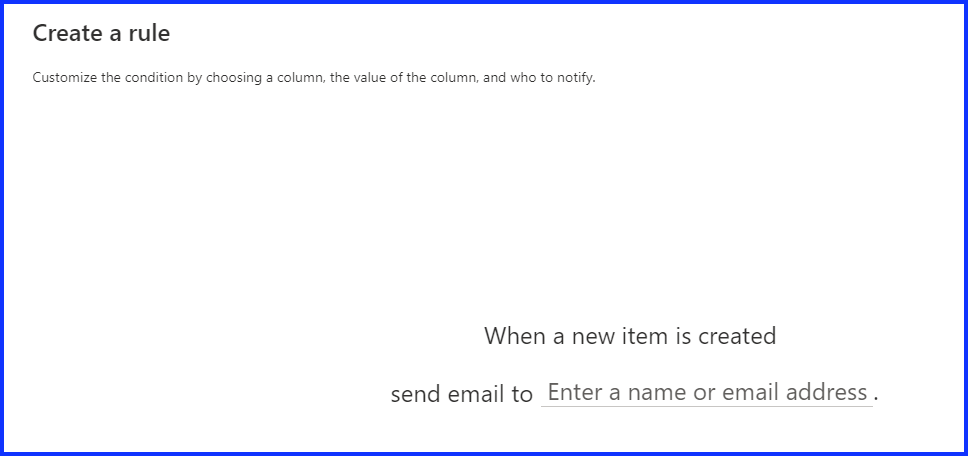
To create a rule, go to the menu bar and click on “Automate”, then mouse over “Rules”, then click on “Create a Rule”. This gives you the option to notify someone when data in a column is changed, a new item is created, or an item is deleted. The notification is via email, and you can provide one or many team members.
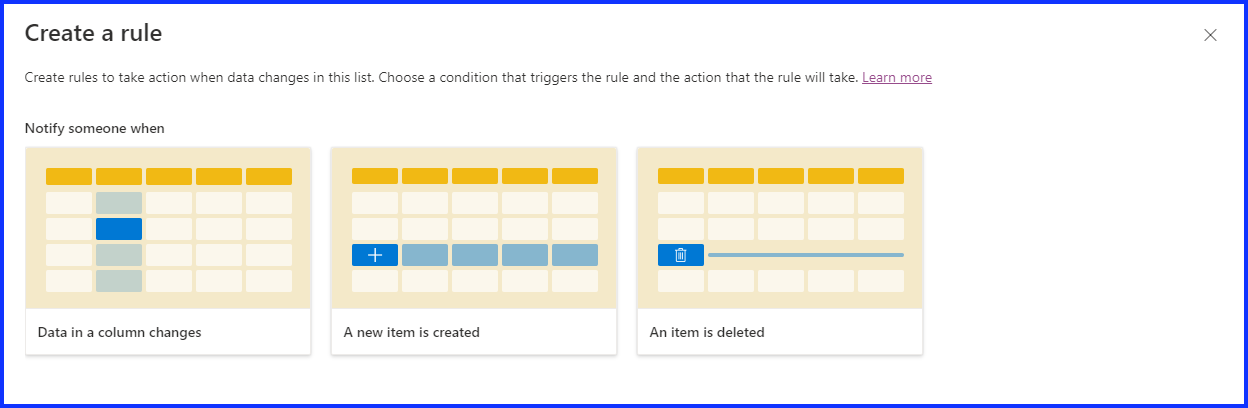
The first option, “when data changes in a column”, you can select the column and depending on the column type will determine what type of condition needs to be met in order to trigger an email.
The latter two, you just need to provide the email address. Any team member who has access to the list can create rules. For more detailed information for creating a rule click here. Click on the images below to see each rule.

Alert Me
The Alert Me function is the same as Rules but with some more options, those include receiving an alert via email or a text message, receiving an alert for any and all changes to the list, based on who made the modification, and receiving daily or weekly notification summary.
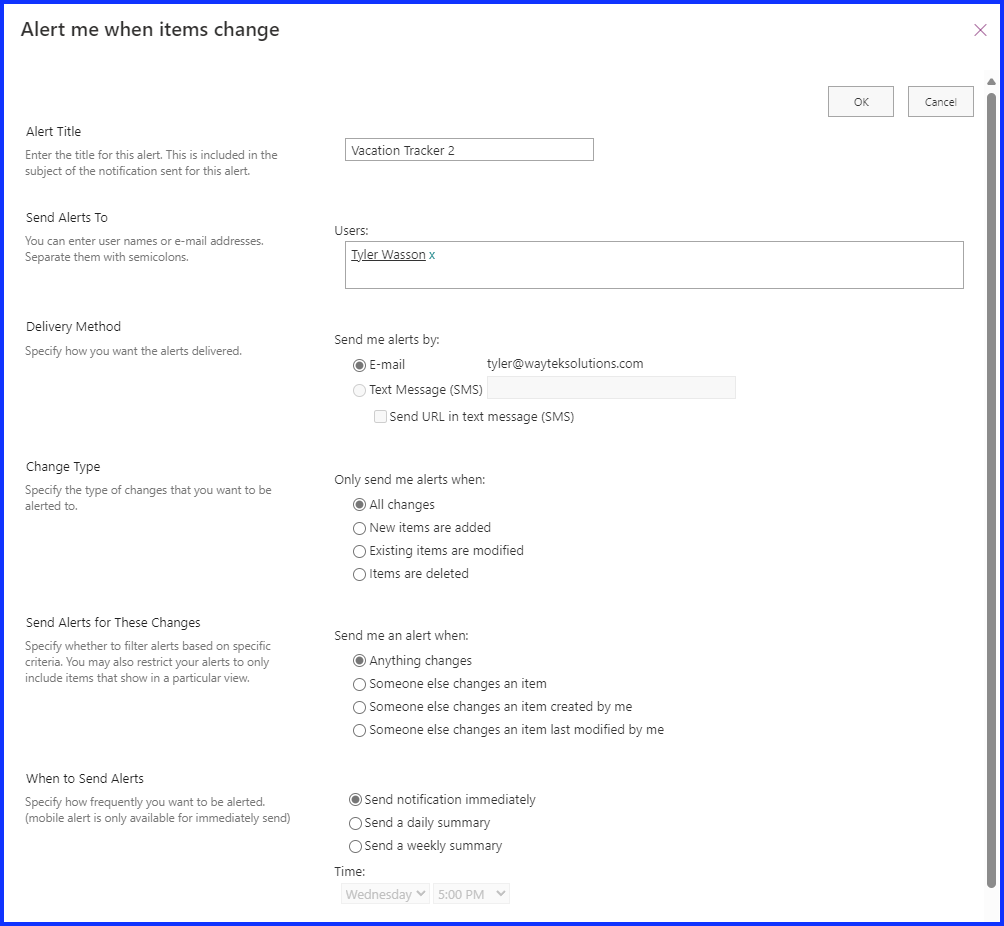
Any team member who has access to the list can create alerts. Both Rules and Alerts help the team see what’s happening within the list without having to constantly check it. Each team member can setup the Rules and Alerts that are most useful to them.
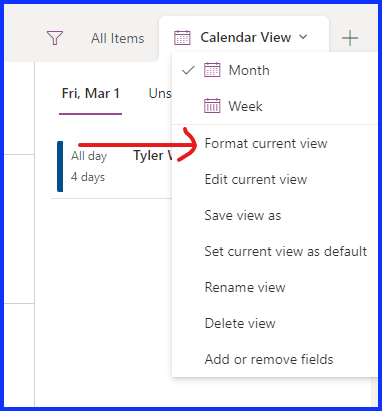
Calendar View Conditional Formatting: Different Colors for Each User
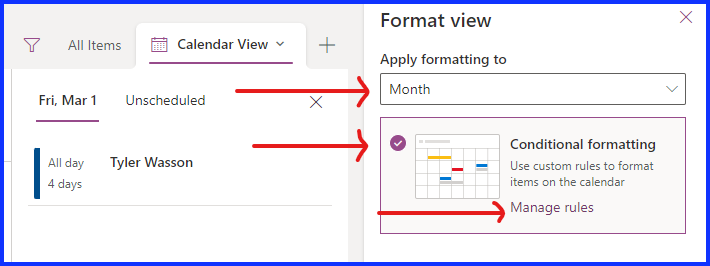
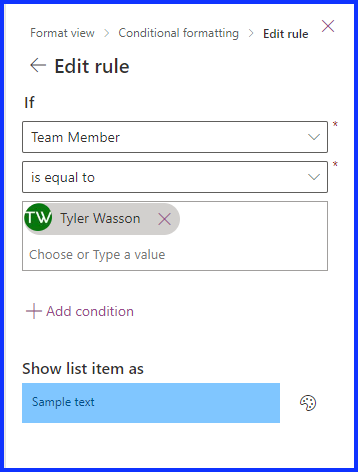
To help make it easier to track different team members vacation on the Calendar View, you can add conditional formatting to the view. To do this, open the calendar view and select “Format Current View”. Apply the formatting to the “Month View” and select “Conditional Formatting”, then select “Manage Rules”. Here you will click on “Add Rule”, choose the “Team Column” and for comparison choose “Equal To” then select the color for that team member or team members. You can continue to add color formatting for the other members of the team. Click on each picture below to see each step in the process.
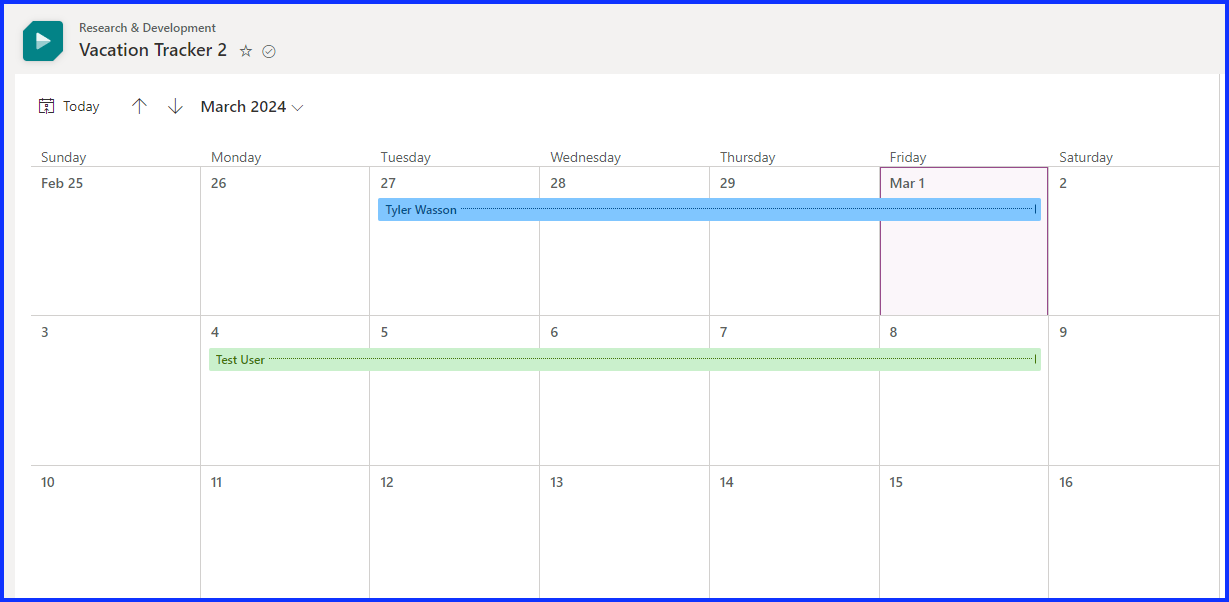
Below you can now see that each team member has a different color for the time they are taking off. This will help visually track the different members especially if there are many.
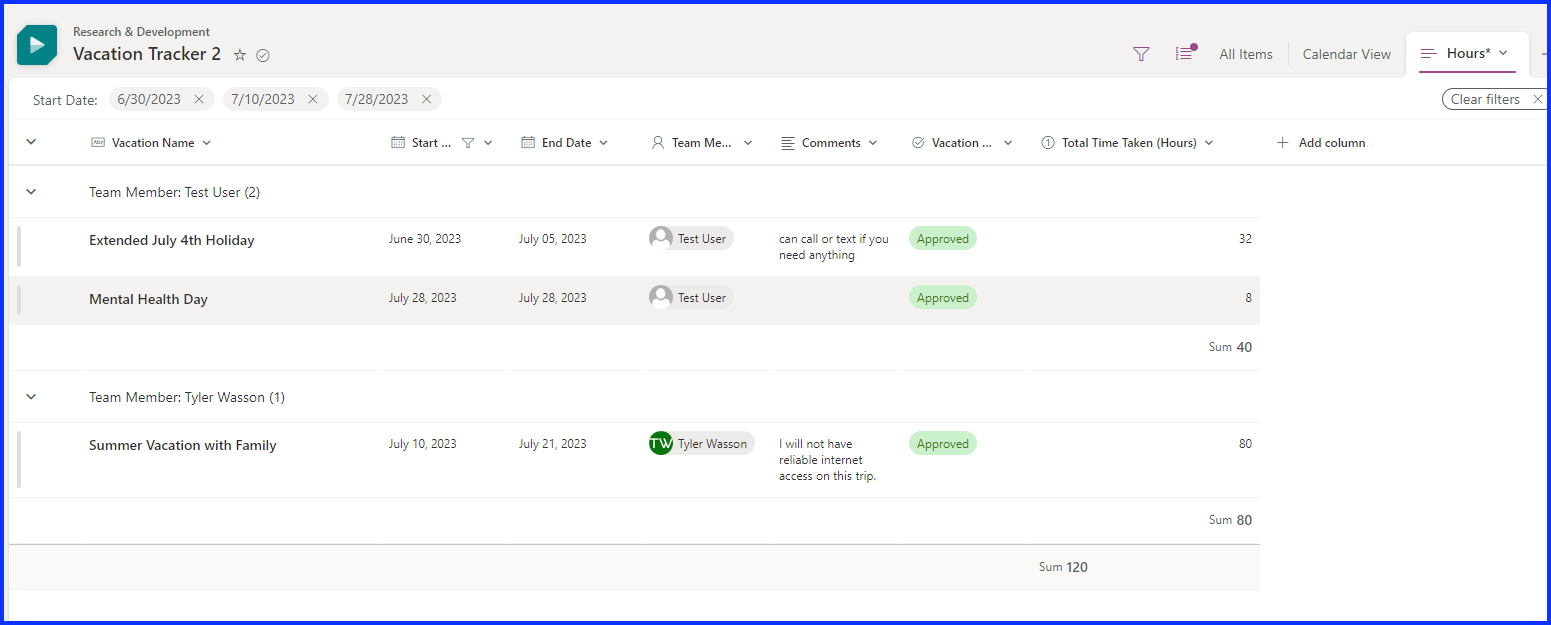
Hours Tracking
The easiest way to track hours is to add a number column in the list, create a new view and do a sum of the number column the new view. To do this, create a new number column by clicking on “Add Column” next to the last column header in the list, I called mine Total Time Taken (Hours). Then create a new List View by going to Views and clicking on the plus symbol, I called mine Hours.
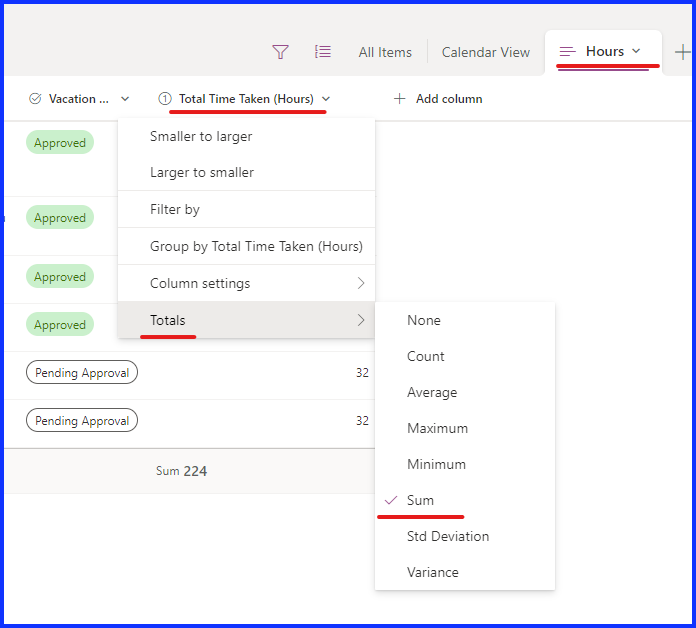
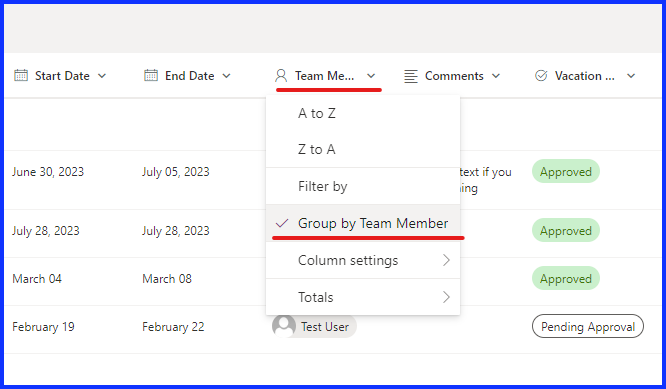
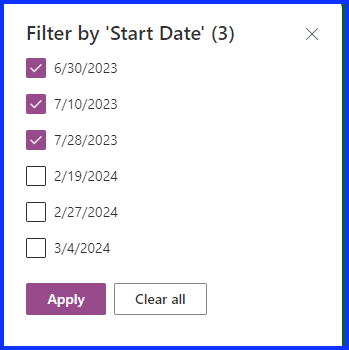
Then go to the column “Total Time Taken (Hours)”, select it’s drop down, go to “Totals” and select “Sum”. This will give you the total of the Hours column for all vacations. Next, select the drop down for “Team Member” and select “Group by Team Member”. This will group all the vacations by team member and provide a subtotal of the hours used for each team member. You can filter the list across time by selecting the “Start Date” drop down and then selecting “Filter By”. You can then select the dates you want to filter by. Click on the images below to see a screen shot of each step.
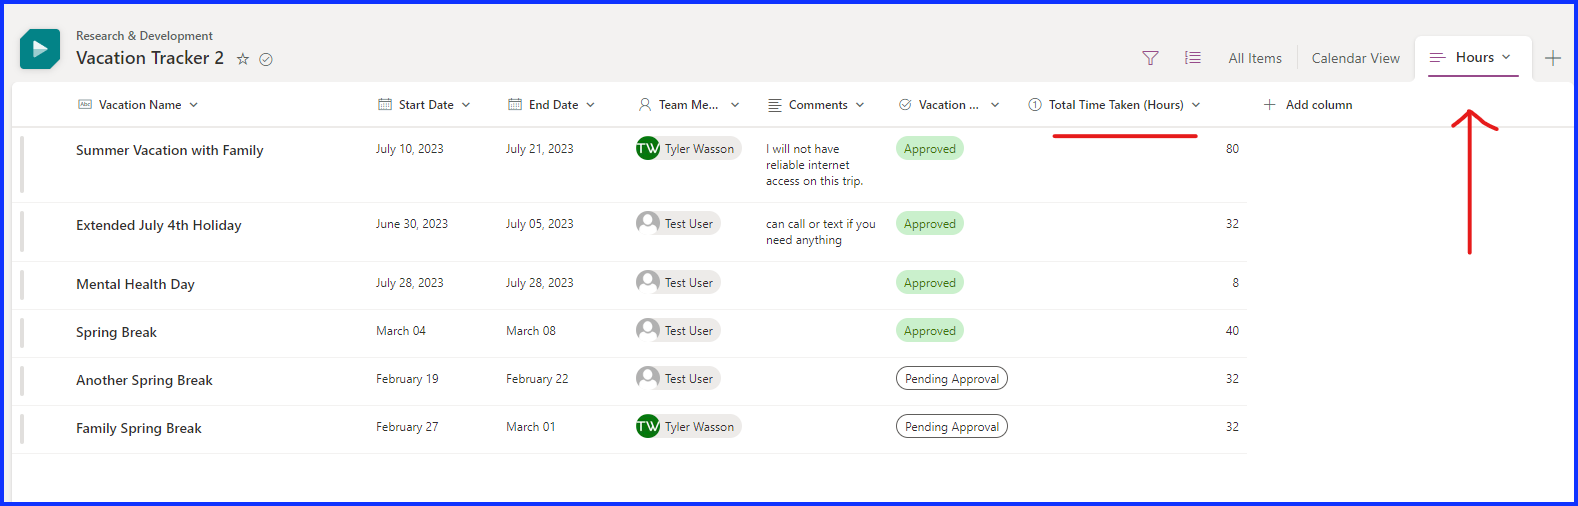
Below shows each team member’s hours used for each vacation and subtotaled for each team member. The list is also filtered by the date field to show only the total hours used over a specific period of time.
Vacation Reminders
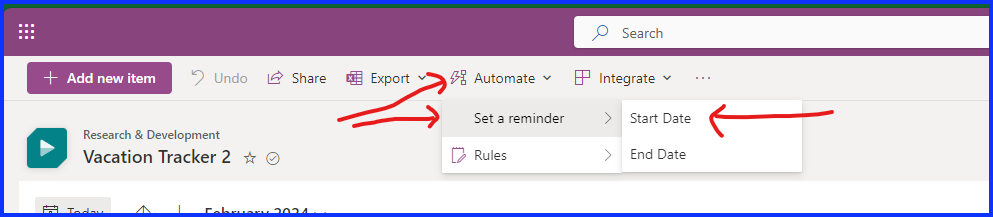
The best way to setup reminders is to use the built in List reminders feature in SharePoint. You can create a reminder by going to the Microsoft List menu, selecting “Automate”, then “Set a Reminder”, and here you should see the date fields in your list, for this list there is “Start Date” and “End Date”.
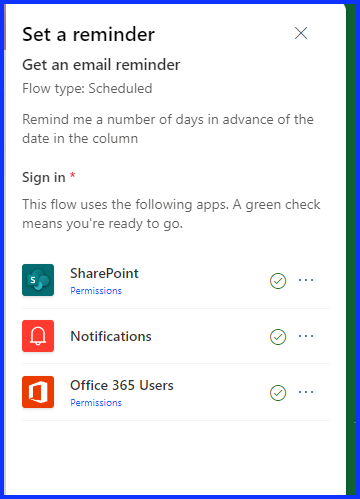
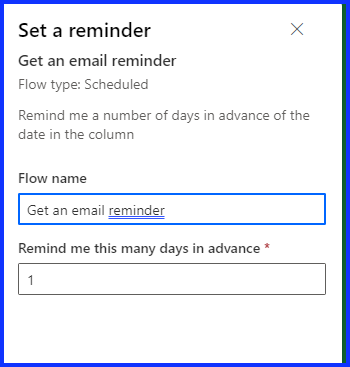
I want to get a reminder for any upcoming vacations, so I’m selecting the Start Date. Then it shows you a window to approve setting up a flow and then it will automatically create the flow after selecting “Continue”. Then you can give your flow a name and the number of days in advance you would like to be reminded, then click on “Create”. The flow is now ready to use. No changes are required but if you need to make changes to it follow the steps below.
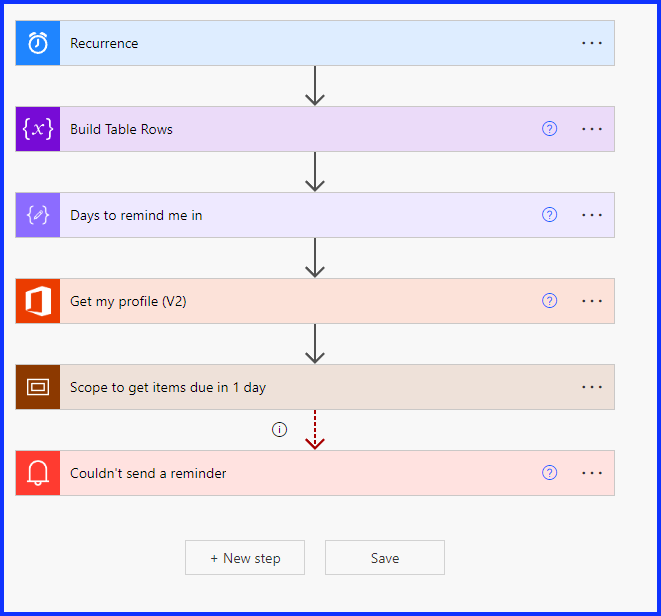
To access the flow, go to the “Power Automate” website, then to “My Flows”. Look for the flow you just created and then select edit. Select “Recurrence” if you want to change when the scheduled flow runs, select “Days to Remind Me In” to change the number of days to receive a notification, then select “Save”.
Below is a breakdown of the flow, I did not make any changes to the original flow. You can come back anytime to make changes the flow. It’s important to note that this flow is only for you and not the team. Other team members can follow the same steps to create the flow, or you can share this flow with your other team members so they can run it too.
Approvals
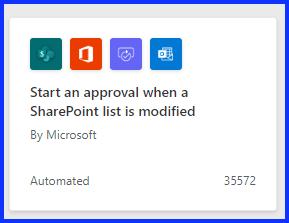
To aid in the creation of the approval process, I am going to utilize an existing Power Automate template. To do this, go to the Power Automate website, then to “My Flows”, select “New Flow”, and select “Template”. Search for “Start an approval when an item is created or modified” and select this template.
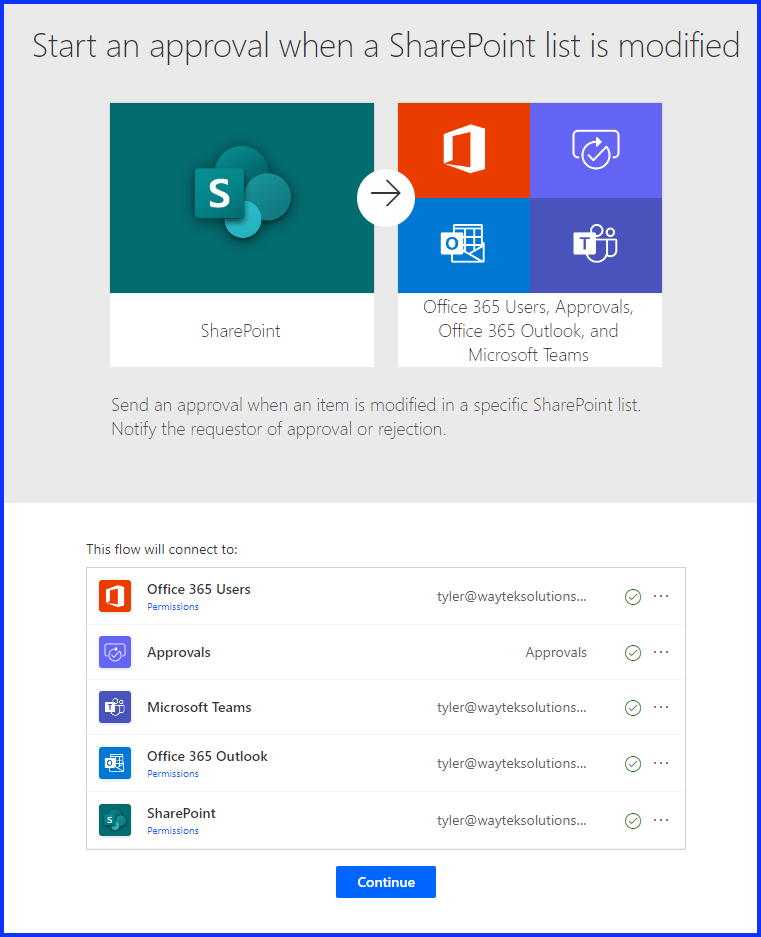
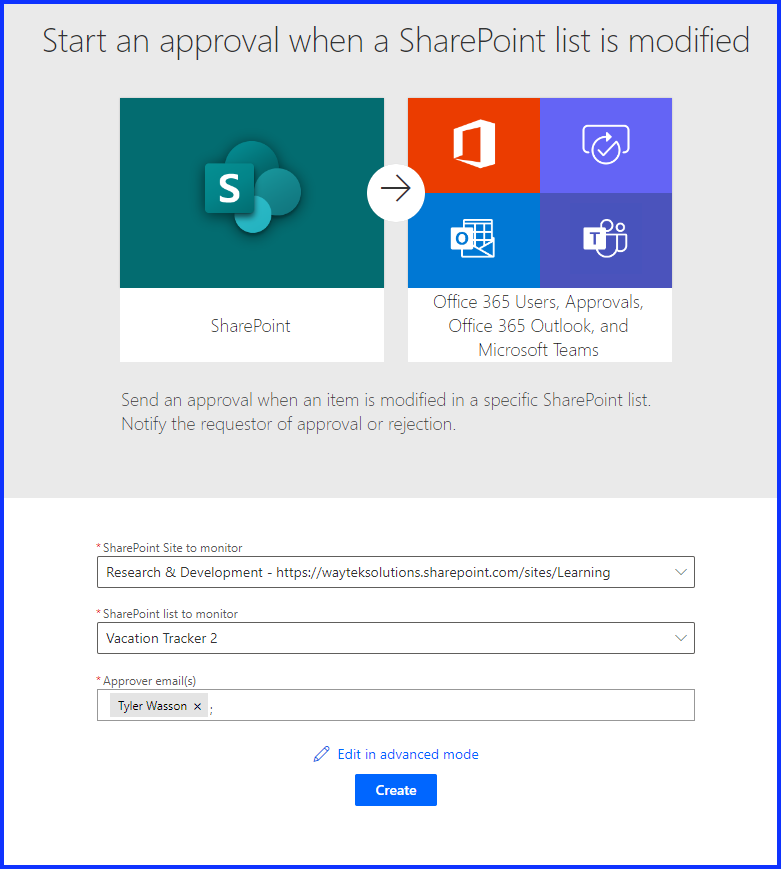
You should see a list of all the connectors in this flow, then click “Continue”. Next, provide the SharePoint site, then the name of the SharePoint List, then provide the name or names of the approvers. As you create new items or edit existing ones in your list an approval will be sent. Click the images below to see the step by step setup.
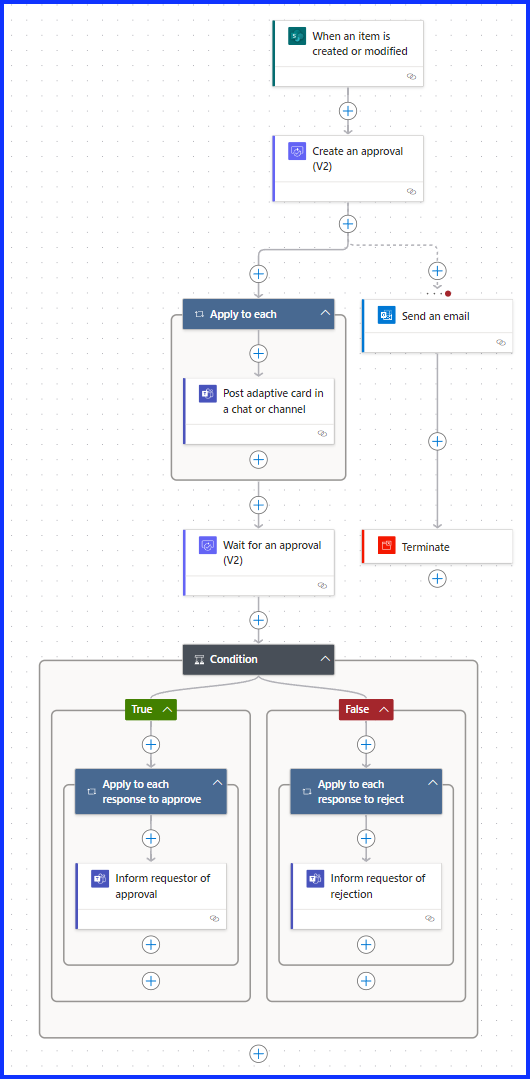
The below image shows the flow as it looks right out of the box but there are some recommended changes to this flow for it to work well with our Microsoft List.
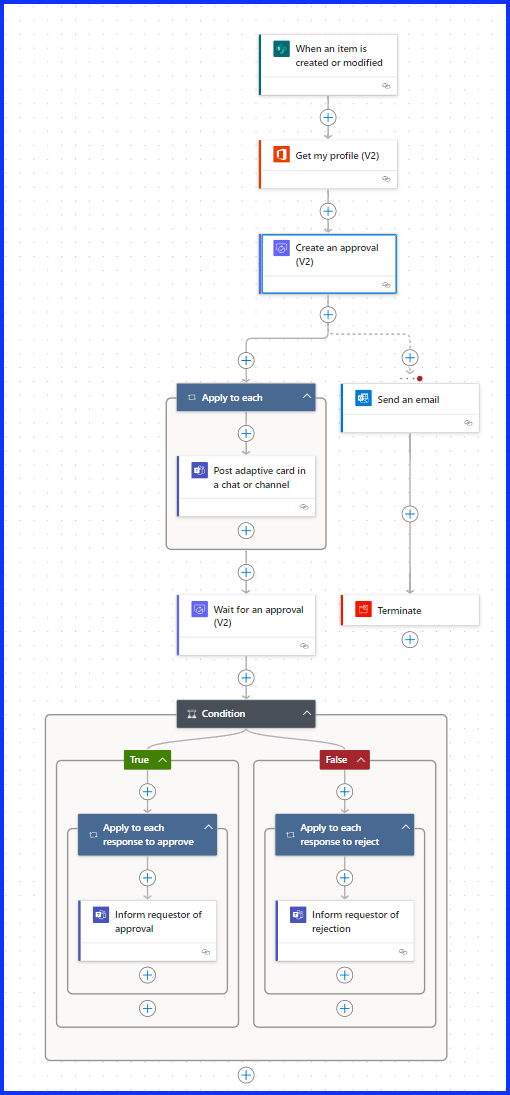
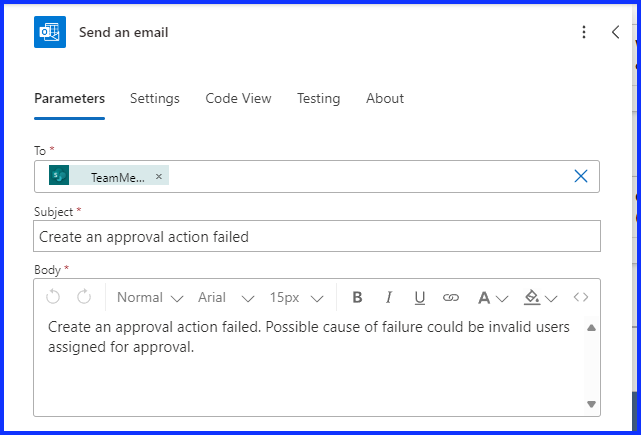
There are some minor changes I recommend making to the flow. First, remove the “Get My Profile (V2)”, second, under the “Create an Approval (V2)” action under advanced parameters, select “Requestor” and choose dynamic content, then select “Team Member Email”. This change ensures the approval request will come from the Team Member provided in the List entry and not necessarily the user who created it. Next, open the “Send an Email” action, then change the “To” field by selecting “Dynamic Content” and selecting “Team Member Email” from “When an Item is Created or Modified”. Select the images below to see the recommended changes and final flow layout.

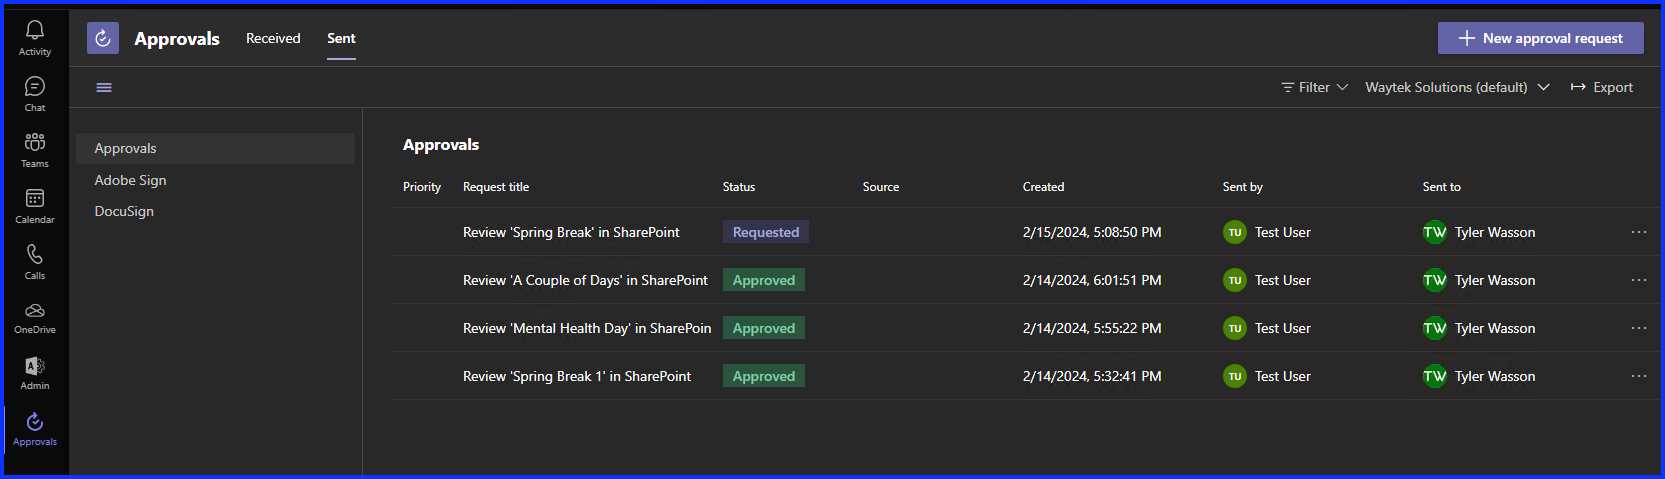
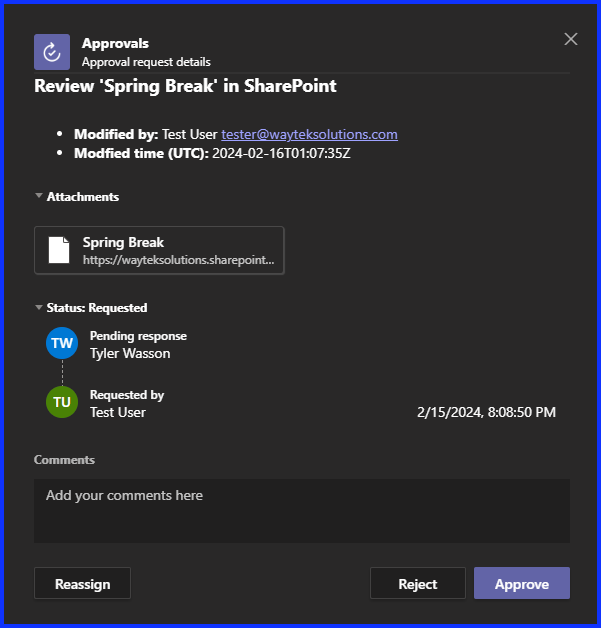
When a new item is added to the List the approval process will send approval notifications to the user(s) provided. The notifications come via email, a Team’s Approval Request, and a Power Automate Approval Request via Teams and Power Automate. Approving or rejecting the request will only need to be done once in any one of these locations and will notify the vacation requester of the response. Click on the images below to see how the approvals look from within the Team’s App.
For more information on Approvals, you can click on the links below:
Get Started with Approvals
Trigger Approvals from Lists Created with Microsoft Lists
Closing
I hope you find these 5 enhancements bring your Vacation tracker to the next level. I’d love to hear your feedback on this post, any recommendations you may have, or any additional enhancements you’d like to see in the comment section below.