Intro:
I received a request from one of my viewers for help in developing a Power Automate flow and after completing the flow decided to do a blog post and YouTube video on it.
The Request:
- The viewer has two manually executed Power BI Export buttons that creates two CSV files that he saves to a folder in SharePoint (Folder 1) on a daily basis.
- One file has 13 columns and 874 rows, the other has 6 columns and 416 rows.
- He then copies the content from each CSV file into one Excel file, saving the contents of each CSV file into its own worksheet, Sheet1 and Sheet2.
- Lastly, he renames the file using the format FileName_yyymmdd.xlsx, and then saves it to a different folder in SharePoint (Folder 2).
I decided to take it one step further by removing the need for the Power BI Export button and querying Power BI directly from Power Automate.
The Excel Template File:
First, you will need to create a new blank Excel file and save it to Folder 1 in a SharePoint Library. I’m calling this file Template.xlsx. In this file you will create two Office Scripts that will be used to convert data from a CSV format to into an Excel format. Each script will be used to add the data into its own worksheet in the final Excel file, Sheet1 and Sheet2.
The Office Script to Convert CSV to Excel
Open the Template Excel file, go to the Automate tab, create a new office script, delete the existing code, and paste in the code below:
*/
* Convert incoming CSV data into a range and add it to the workbook.
*/
function main(workbook: ExcelScript.Workbook, csv: string) {
let sheet = workbook.getWorksheet(“Sheet1“);
// Remove any Windows \r characters.
csv = csv.replace(/\r/g, “”);
// Split each line into a row.
let rows = csv.split(“\n”);
/*
* For each row, match the comma-separated sections.
* For more information on how to use regular expressions to parse CSV files,
*/
const csvMatchRegex = /(?:,|\n|^)(“(?:(?:””)*[^”]*)*”|[^”,\n]*|(?:\n|$))/g
rows.forEach((value, index) => {
if (value.length > 0) {
let row = value.match(csvMatchRegex);
// Check for blanks at the start of the row.
if (row[0].charAt(0) === ‘,’) {
row.unshift(“”);
}
// Remove the preceding comma.
row.forEach((cell, index) => {
row[index] = cell.indexOf(“,”) === 0 ? cell.substr(1) : cell;
});
// Create a 2D array with one row.
let data: string[][] = [];
data.push(row);
// Put the data in the worksheet.
let range = sheet.getRangeByIndexes(index, 0, 1, data[0].length);
range.setValues(data);
}
});
// Add any formatting or table creation that you want.
}
//End of Script
Name the Office Script to “Convert CSV”, this script converts CSV data to Excel and will be used later on in the flow. This is where I found the script in case you have any issues with it: Convert CSV files to Excel workbooks – Office Scripts | Microsoft Learn
Create a second Office Script in the same Template file, name it “Convert CSV Worksheet 2”, and copy the same Office Script above, but after pasting the script, you need to update the script by changing the worksheet from “Sheet1” to “Sheet2” and save the script and the file.
We will be calling these scripts from within Power Automate to convert the data retrieved from Power BI from CSV to Excel format.
The Power Automate Flow:
I’m using a manual trigger for this flow, but it will most likely be ran as a scheduled cloud flow once or multiple times a day.
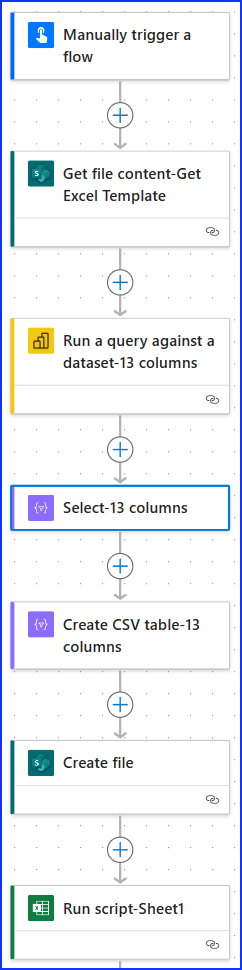
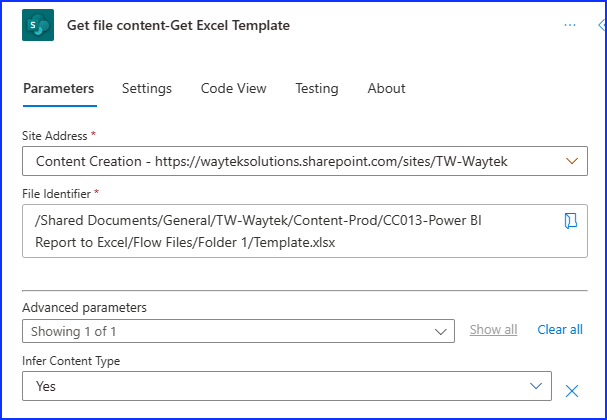
Get File Content – Get Excel Template
The first action will be to get the file content from the Excel Template file. This action will grab the info on the two scripts.
Select “Get File Content” (SharePoint)
Provide the SharePoint site address and file location for the Template excel file. Select “Yes’ to Infer Content Type under advanced parameters.
Run a Power BI Query Against a Dataset
Open Power BI Desktop and go to the report visual you want the dataset from.
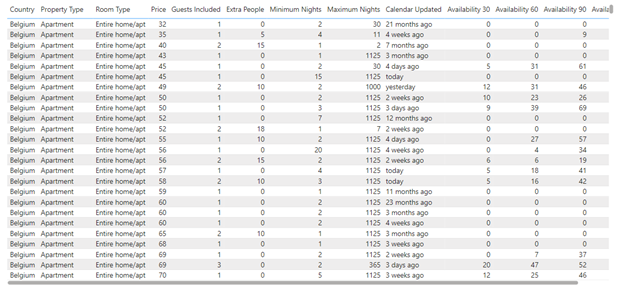
I transformed a large dataset I pulled from Kaggle on AirBnB Listings using Power BI Power Query to match his query sizes of 13 columns 874 rows in one visual and 6 columns and 416 rows in the other visual.
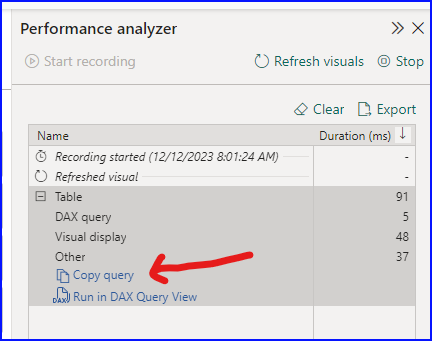
From within Power BI Desktop, click on your visual and go to the Optimize Menu tab and click on Performance Analyzer. From here, click on Start Recording, then Refresh Visual, underneath expand the Table + button and then click on “Copy Query.”
Now go back to your Power Automate flow and add a new action called “Run a Query Against a Dataset (Power BI)”, select the Workspace your Power BI report is in and then the dataset for the report, under Query Text paste the query you copied from the Power BI Performance Analyzer. Under Advanced parameters, I choose to include nulls so that result will be the same as the PBI visual. The query text is in DAX and is based on the structure of your visual.
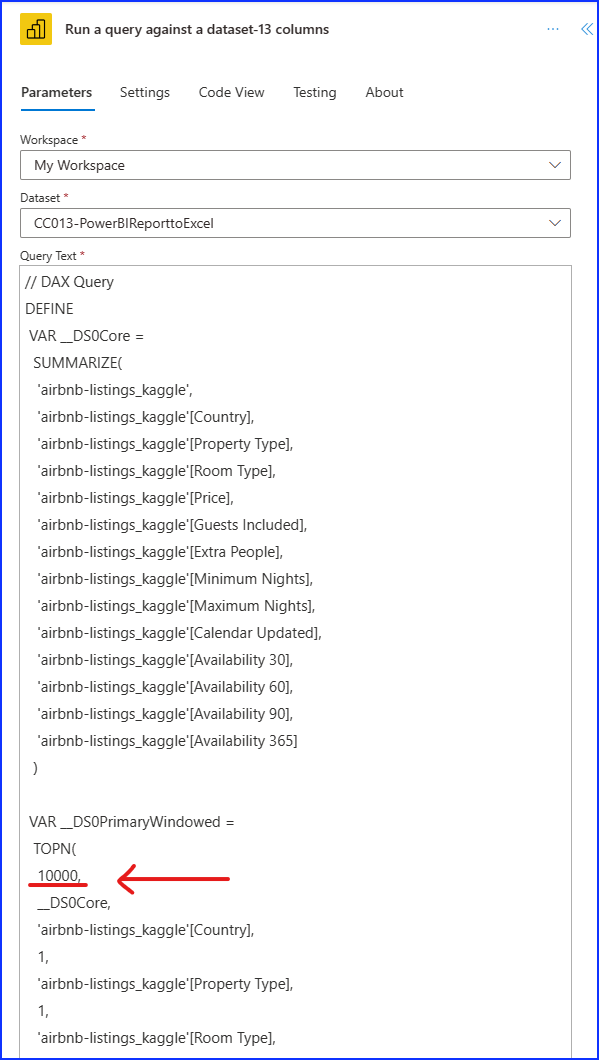
And for DAX query, I needed to change the number records to include as the default is 501. I changed mine to 10,000 to make sure I’m covered.
VAR __DS0PrimaryWindowed =
TOPN(
501, – replaced with 10,000
__DS0Core,
Select Action
Next add a Select action and name it “Select-13 columns”. We are doing this to map the column names from the Power BI visual to the CSV table in the format we desire, else it will be in the format: Table Name-Column Name.
Under the From parameter select dynamic content, the only option should be First table rows from the Run a query against a dataset-13 columns. Under the Map parameter, add each column name from the PBI visual where it says enter key, in the second column where it says Enter Value select Expression and write in this formula and click add:
item()?[‘airbnb-listings_kaggle[Country]’]
Where airbnb-listings_kaggle is the table name and [Country] is the column name. Repeat this for each column name in your Power BI visual.

Create CSV Table
Next add a Create CSV table action and name it “Create CSV table-13 columns”. Under the From parameter, select dynamic content, and choose the output from the “Select-13 column” action. Under Advanced Parameters I selected to have the Columns as Automatic.
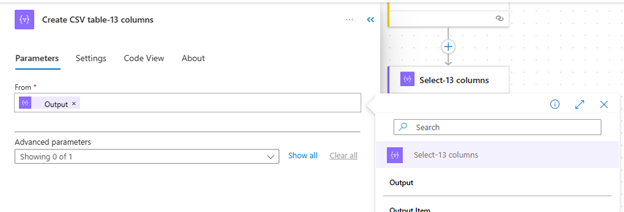
This will give us the data from the Power BI query, with the proper column headers and in a CSV table.
Create File (SharePoint)
Add the Create File in SharePoint action. The folder location will be where you want the new file to go, provide the Site Address and Folder Path. For the file name I’m calling it F3_today’s date and time.xlsx, add an expression where the date time stamp will go:
F3_formatDateTime(utcNow(),’yyyyMMdd-hhmmss’).xlsx
Lastly, add the file content from the Get File Content-Get Excel Template action, this was the very first action we did.
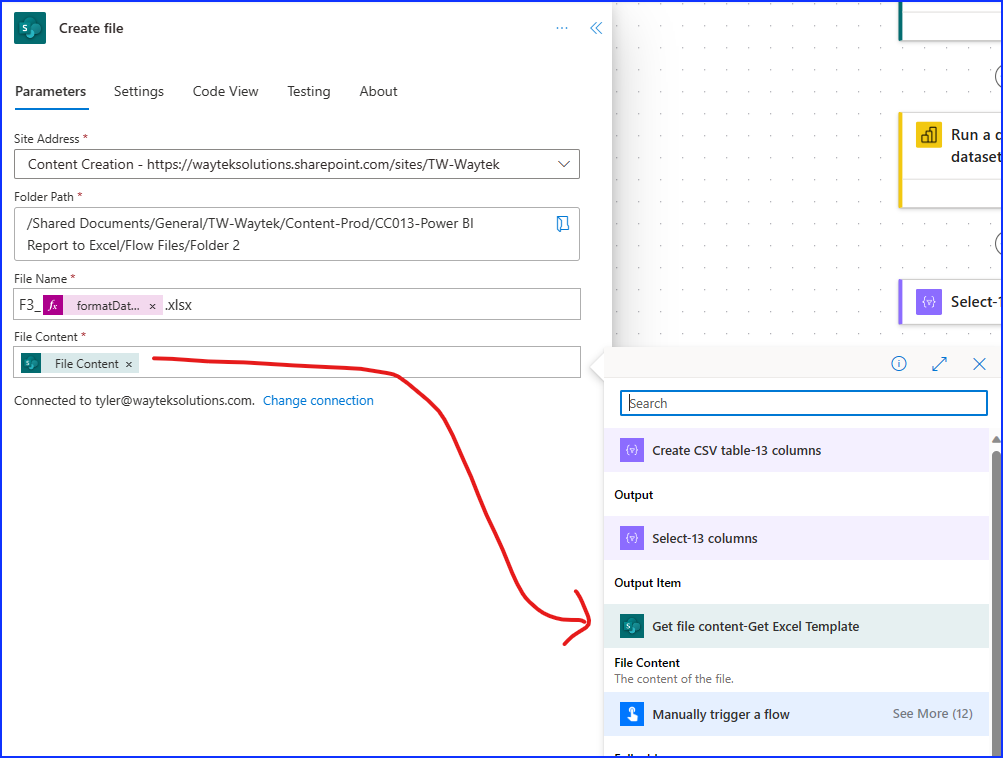
We are grabbing the content from the template file that has the two scripts in it.
Run Script (Excel)
Next, create a new action and select the Run Script (Excel) action and name it Run Script-Sheet1. Select the location and Document Library the same as the Create File action file location. For the File parameter use dynamic content and select the body/id from the Create File action. Under the Script parameter select the name of the first script “Convert CSV”. Under Script Parameters/CSV parameter select dynamic content select the Output from the action Create CSV table-13 columns.
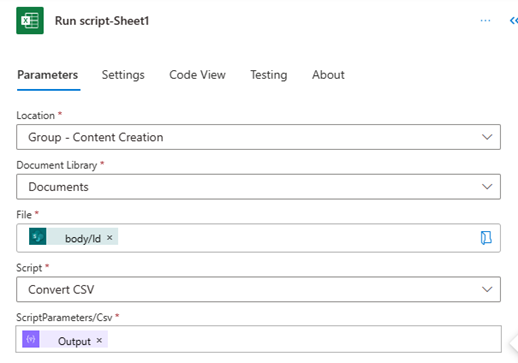
This action will run the script and convert CSV file we created in the previous action into an Excel file format and put the contents into Sheet 1 and in a table format and with the proper column headers.
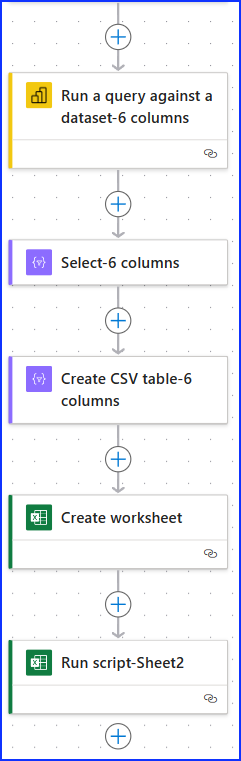
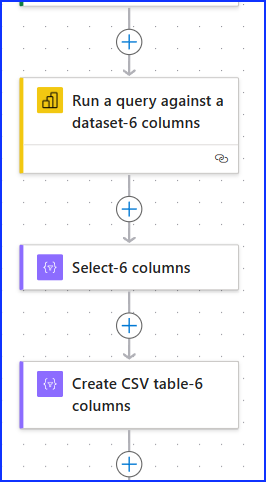
Repeat Above Actions for 2nd Query and Sheet 2
The next 3 actions shown below are repeats but for the second 6 Column Power BI visualization query where you can follow the same steps as above.
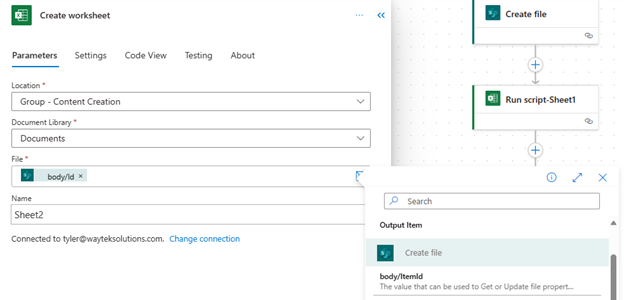
Create a Worksheet
Next, we are going to create a new worksheet in the Excel file we created by adding the action Create Worksheet (Excel). Provide the location and document library where the Excel file is, based on the same location where the Create File action file location is. For the File parameter, select dynamic content and choose the body/id under the Create File action. For the Name parameter, use the name Sheet2, this is to match the office script name which was also Sheet2.
Run Second Script
Lastly, we are going to run the final script. Add the location and document library where the Create File action location is. For the File Parameter use the body/id from the Create File action. Under the Script parameter select the 2nd script called “Convert CSV Worksheet 2”. Under Script Parameters/CSV, select dynamic content select Output from Create CSV table-6 columns.
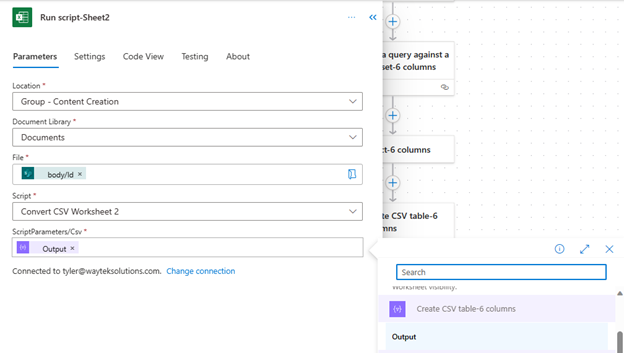
This will convert the second CSV table into an excel format and save it to the worksheet Sheet 2.
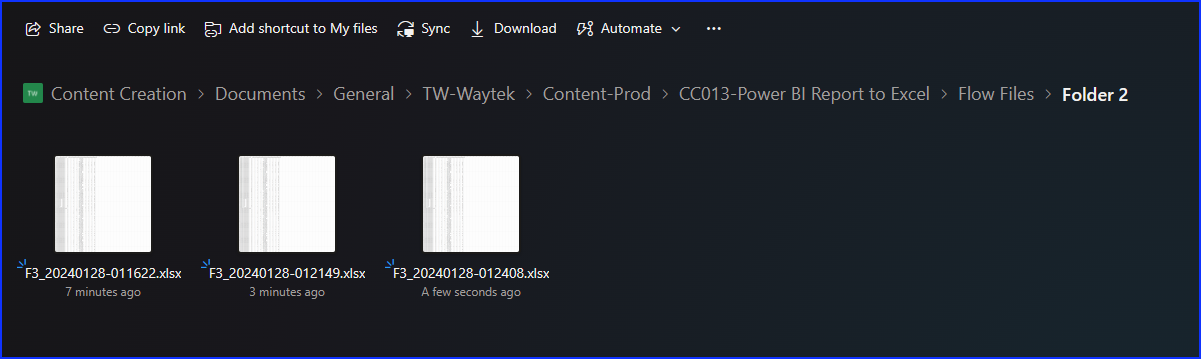
Test the Flow
Now you should be ready to run the flow. Below are three files where the flow was run on the same day but with different time stamps.
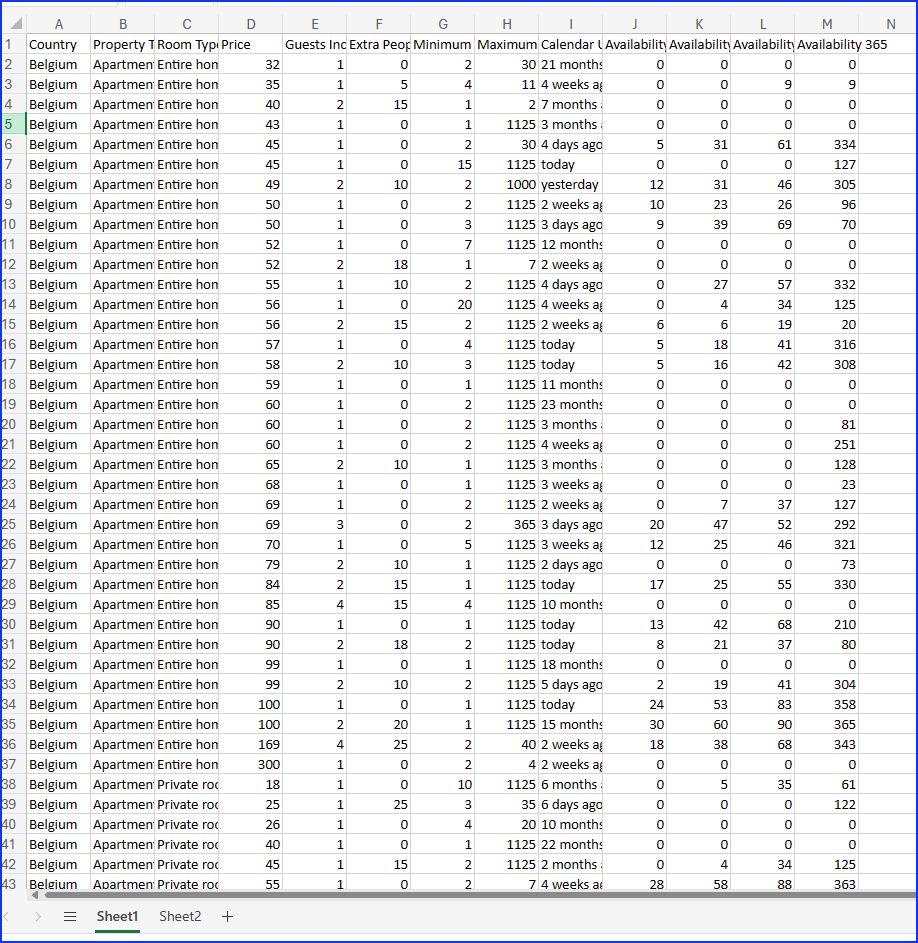
These are the results of the two queries in the final Excel file.


3 Responses
I’ll right away seize your rss as I can’t in finding your email subscription link or
e-newsletter service. Do you’ve any? Please
let me realize so that I may subscribe. Thanks.
Hello John,
Thanks so much for reaching out. I’m currently on Twitter, Facebook, LinkedIn, and YouTube, but do not have an email subscription service, it is something I’ll be adding in the near term. I appreciate your feedback and interest in my blog.
Hello John, just a heads up, I have added the ability to subscribe to receiving email updates from my blog.